Application #4: ArchiveDB
- muhdhaziq8190
- Jun 2, 2021
- 14 min read
Updated: Jun 4, 2021
Introduction
ArchiveDB exists for players of the mobile game, Blue Archive. If you are unfamiliar with it, as mentioned it's a game for mobile devices where users g̶a̶m̶b̶l̶e̶ play as a teacher to nurture their students by sending them into battle against deadly forces. The basic premise involves a strategic gameplay of guiding these students to victory during these battles.
ArchiveDB, as implied in its title, is a database application consisting of information regarding these students, such as their skills and basic information. As a bonus, there is also a gacha simulator included for users to test their luck in pulling the rare and elusive 3-star characters, perhaps even before pulling in the actual game.
NOTE: If you don't know what gacha is, it's a s̶c̶a̶m̶ system whereby players receive an a certain item from a pool of items at random, each item having its own rarity and chances. The higher the rarity, the lower your chances to get them. In Blue Archive's case, the gacha system revolves around the students you use on the battlefield.
Existing Problem
While there are many resources online to retrieve information regarding the characters of Blue Archive, it struck me as odd that there wasn't really one for the platform the game was on to begin with; mobile devices. This being the case, it was difficult to look for character information, as I would have to open up my browser, access the online wiki links and search for the respective character.
This is exactly what sparked me to create an app where all information would be just there from the get-go. And with the game being only a few months old (release date was 4th February, 2021), I feel that such an app would catch on pretty quick.
Competitor Analysis
NOTE: There really isn't any database-type applications for Blue Archive, so I've picked db apps for other gacha games as sort of a benchmark
#1: Arknights Tools


Strengths:
Simple UI
Multi-lingual support for different servers
Multiple filter/sort options making it easier to view characters
Weaknesses:
UI could be better; made to be more appealing
Opportunities:
Can be very effective as Arknights itself is still a pretty popular gacha game
Threats:
One of the few applications on Arknights, so people would likely flock to this over newer applications
#2: BF Mini Wiki - Brave Frontier Mini Wiki
https://play.google.com/store/apps/details?id=com.earthlingstudio.bfwiki


Strengths:
Amazing UI
Very intuitive
Weaknesses:
The application is made for a game that's quite old, and not many people are playing it
Opportunities:
While there are several Brave Frontier apps, this is the most intuitive and user friendly
Threats:
Most would flock to this application as it's the biggest in its field
My Solution: ArchiveDB


Development Process
Firebase Database
Similar to my last app, since this is also a database application, the first thing I needed to do was figure out the data was being input. I figured Firebase would be the best option, at least for now, to input the vast amounts of data I needed. After thinking through the fields I needed to add that pertains to the characters, I added some test data into the Realtime Database.


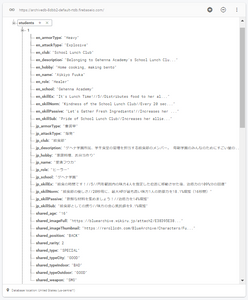
I shortly found out... that manually inputting data into the RealtimeDB was going to be a real headache, especially since each character has an abundance of data attached to them (with the added fact of me wanting to make the app multilingual as well).
The images above showed the end result of the data I added. I added three test character data at first, and realizing how much longer it would take me to added the other 51 characters in the game at the time (total of 54), I started dreading it more and more.
So instead of creating them manually in Firebase, I decided to write some code within the ArchiveDB application to add them (since I would need some of these functions later on anyway). I created a Character class and wrote the setters so it would be easier for insertion into Firebase.


Once I was done with the class, I created the Character object in the onCreate() of MainActivity to insert them. However, since it would take a really long time to do it individually, I set aside one weekend to add all the character data. I did this through Notepad++ for each and every character, and all I needed to do was to add their respective data into the brackets, afterwards copy-pasting the template again for the next character.
NOTE: The actual character data themselves are retrieved from various sites that offer them


It took me almost 20 hours setting up all the data and when I finally did, all I needed to do was paste them into the MainActivity, run the app, and watch the data magically be added into the Realtime Database.
Application Development - Students Activity
Toolbar
After that massive headache was over and done with, I could finally begin working on the actual application. The first thing I did was add a Navigation Drawer to my application. For that I followed an online tutorial that will be linked below.
I started with creating the toolbar that will appear at the top of each screen.


The toolbar consisted of three things: hamburger menu to the left, app title in the middle, and a custom toggle switch to the right for swapping between English and Japanese. Okay, simple enough. Next, I did the actual navigation drawer to lead the user to the different activities of the app.
Navigation Drawer

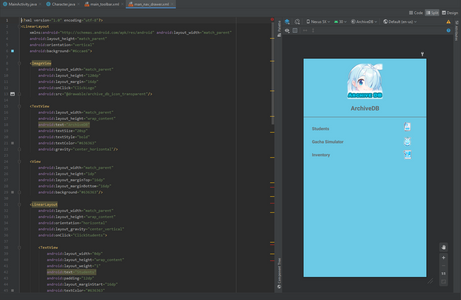
The app will be divided into three sections: Students, Gacha Simulator and Inventory:
Students: All characters will be displayed here, where users can top on and view more details regarding them
Gacha Simulator: A simulator for the gacha system within the actual game, whereby players are able to pull characters with certain probability for each of them
Inventory: This is where all the characters the user has pulled in the Gacha Simulator are stored
The icons for each of those functions were retrieved from the game itself. I simply photoshopped them out through a screenshot taken. As for the app icon on the top, I made a simple one (also through Photoshop), which features Arona, one of the mascots of the game, along with the title of the app. It's a little low resolution, but that was the best I could do given what I had.
Students Activity
Next up comes the first activity of the application: the Students activity.


In this activity, there are a few features here:
GridView to retrieve and display the characters from the Firebase Database that I added earlier
ListView that can be freely swapped between both Grid and List based on the user's preferences
Search feature to look for a specific character
Filter button to filter the characters displayed based on certain parameters
Custom GridView & Row Layout
With those UIs done, let's look at some code.
For the GridView, it really wasn't that hard to work with as it's basically the same as ListView, which I was already familiar with. I wanted to make a custom GridView which meant I needed a custom layout as well as a custom adapter.


To the left, is the layout for each individual item of the GridView. The black box corresponds to the character icons that will be displayed.
To the right, is the custom GridAdapter used to link the layout to the GridView. Some things to note here would be the use of the Glide API as the image stored in the database is really just a link to the actual image online. An added bonus to this API is also being able to display the images in a circular frame rather than having to create a layout for that myself.
The langBool variable is there to change the data based on the language set by the language ToggleSwitch which I will get to later. Basically, if it is set to true, the language will be set to Japanese, otherwise it will be English.
Custom ListView & Row Layout


Here is the ListView part section that the user will be able to swap to. The concept is pretty much the same as the GridView, nothing much to say here.
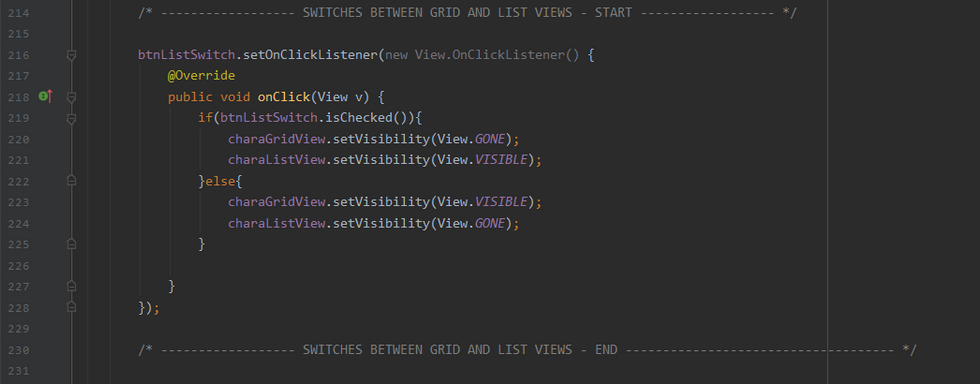
Switching between List and Grid Views
This next part will be to swap between GridView and ListView, which was actually really simple to do. I added in a ToggleSwitch; if it's checked, swaps to ListView. Otherwise, switches back to GridView. This could be done by simply setting the visibility states of the views to GONE/VISIBLE wherever necessary.

There's not really much to say about the ListView itself since it's pretty much similar to the GridView. Create a custom row layout, custom adapter, attach them and done.
Search Function
Next part comes the Search feature. Basically, the data that is being added into the ArrayLists are done based on the state of the EditText used as the search bar. If the search bar is empty, all characters will be added into ArrayList. Otherwise, if there is something written in there, only characters with matching given names will be displayed.
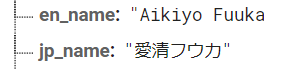
Above is how the names are displayed in Firebase. Retrieving a character's given name in English is simple enough; just use .split() on the retrieved name string with a spacing " " as a separator. For Japanese however, it's a little more complicated as spacing isn't really used.
The idea I had to achieve this was simple in theory, but actually implementing it was a little difficult. Basically, the string for the Japanese name consisted of two different writing systems of the Japanese language: kanji and katakana. The family names of each character is usually in kanji 愛清 (Aikiyo), while the given name is in katakana フウカ (Fuuka). Since I only need the given name, all I needed to do was find a way to detect only katakana characters from the retrieved string of her full name.
It took a bit of searching, but I eventually found out what I needed to do, and that was to use regular expression. All this time, I thought regex only applied to alphabets in the English language, but that's not the case. It also applies to other languages as well, including the Japanese language, and by extension, katakana characters as well. Great, just what I needed.
And so, I started creating the method to retrieve both the English and Japanese given name of a character.

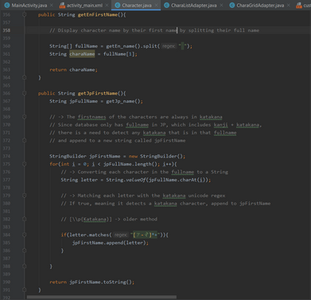
As mentioned before, all I needed to do to detect katakana characters was use regex. This is what I used: [ァ-ヾ]*
Essentially, all I did was loop through each character in the JP name string. If it detects a katakana character with the above regex, it appends it to a StringBuilder variable, which is then returned as a string once the loop was done.
Now the search feature is complete... right? Wrong. One thing I found strange was the fact that only katakana inputs were required for the user to actually retrieve the character. I didn't mention this before, but Japanese has another writing system: hiragana.
To give a basic rundown, katakana is mainly used for incorporating foreign words (and sometimes just making things easier to read), while hiragana is for the traditional usage. They are both read the same way, so for example, あ in hiragana is read as "A (as in Ah)", and ア in katakana is also read as "A".
In short, same readings/pronunciation, but each have their different uses.
Japanese String-matching
Anyway, back on topic. I wanted to allow hiragana inputs to also match the character's names that were in katakana. And for that, I consulted my good friend Google. After some extensive research, I found a source code done by someone to do just that which essentially "converts" a hiragana string into a katakana string through a bunch of unicode manipulation. To be honest, I don't fully understand how the conversion works myself, since unicode is something that's relatively new to me.
There was one slight issue with it, though. The code I found converted only the first character of the hiragana string into katakana and returns it. What I needed was for it to return the entire string in katakana. But luckily enough, that wasn't too hard to do. I just had to change the return type and add a loop for each character to convert them into katakana, then return it as a string. Simple.

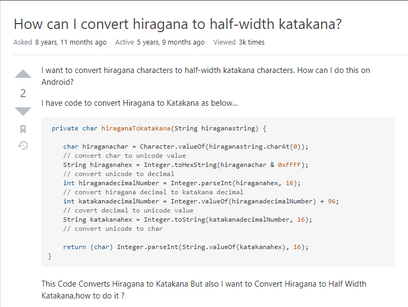


The right shows where I found the original code for it, while the right is my modified one.
(Best part about this was that I found a proper library to convert the two writing systems way afterwards... that was also in that same StackOverflow post... yay)
Filter Function
With that done, let's look at the next feature I implemented: Filters.
Each character is one of two types: Strikers or Specialists (shortened to Specials). Using this feature will allow users to view only characters of a particular type, making it easier for them to look through the list should they be looking for something more specific.
For this, I used a custom popup dialog, again with the images retrieved from the game itself, as well as some photoshop to clean a bit of it up.


The filter options above are all just radio buttons with images, so handling the selection for them would be easier to handle.
For the coding part of it, it wasn't as hard as I thought it would be. I just had to create a button to start up the dialog.


NOTE:
The switchLangOnOff is a global bool to tell the application what language it's set it. To be covered later.
The btnSortOnOffSwitch() method is just there to set the active/inactive states of the radio buttons to different images.
I didn't quite mention how the data was retrieved from Firebase earlier since it involved the filter function. Depending on which filter was selected, different character data would be retrieved, as can be seen below:


Originally, I had wanted to put in more filter options, such as filtering through rarity, which school/organization each character is from etc. but that wasn't something I could do given the time frame. So sadly, I had to put those additional features in the bin and move on to the next one.
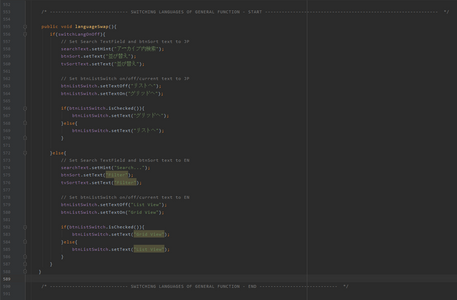
Custom ToggleSwitch for language switching
Onto the final part of this activity, which is actually a feature that will be implemented across all activities: the language switcher. It's basically just a custom toggle switch. If it's active, the language will be set to Japanese. Otherwise, it will be in English.
For that to be done, not only do I have to change the values of the data retrieved, but I also have to change the placeholder text for the search bar, ListView swapper etc.

SharedPreferences
Also, as an added bonus, I added some SharedPreferences to save the language switcher as well as the filter feature:


Application Development - Student Details
This activity is linked to the Students Activity's List/GridViews. Tapping on a character will lead them to this screen which, as the title describes, displays more details regarding that character, be it skill information or just flavor text.


In terms of information retrieving, it's also from Firebase and it's done pretty much the same way as the StudentActivity so I won't get into it too much. Before actually transitioning into this screen, I put in some data into the intent for the character's name, which I then used to match with the characters in the database for retrieval.
The black box on the top right is there for the full body image of the character which when tapped, will enlarge the image in full screen. How this was done was by an official documentation by Android for enlarging the image:
As for my understanding of the code in that documentation, I only understood enough of what was needed to get it running in my application. The specifics are honestly a little complex for me to understand.
After the character image is enlarged, the user is also able to zoom in even further on the image by pinching on the screen, or double tapping it. This was done through an external library called PhotoView. Similarly to the icons, I also used this along with the Glide API to display the image from a link.
Apart from that, there really isn't much to say about this screen, apart from the character rarity to the left of the ImageView being done by using a rating bar. Everything else from the retrieving of data, sharedPreferences, and language switching is pretty much the same as Student activity.
Application Development - Gacha Simulator
This next screen is more of just a fun "game". As I mentioned at the beginning, a gacha system is basically just getting an item from a pool of items with different chances based on their rarity groups.
Layout & UI


The design was relatively simple to make. Just another GridView to display the summoned characters for the multi-pull, and a separate LinearLayout for a single pull. Multi-pull refers to generating 10 random characters at once, while single pull refers to just a single character. The custom grid row is pretty much the same thing as what you see in the middle box there with the green background, which there for the single pull.. Whenever the user summons a character, they will get a different background based on the rarity of that character.
For example, pulling a 1 star gets a silver background, 2 star gets gold, and 3 star gets rainbow. As per my routine, the background images used for those were taken from the game itself.
Manipulating Probability
Honestly, the implementation of the gacha system wasn't as hard as I thought it would be. At first, I figured manipulating probability would be something I'd be stuck at for a long while but as it turns out, it took me about less than hour to actually implement it (not counting the many, many, many more hours agonizing and overthinking it).


Basically, just generate a random double from 0.01 to 100 to represent 1% to 100%. If the random number is below a certain amount, that value will be the rates. You work your way up the additive rates to 100%.
So, as can be seen from the snippet above, if the random number is below 2.5, the rates would be 2.5%. Second else if would be 18.5% as it takes 2.5 subtracted from 21, so on and so forth.
Those rates above are essentially to pick out the rarity of the characters to be retrieved. Once the respective rarity ArrayList has been selected at random (based on the rates), then another random integer value will be generated, which will then be used as the index to select from the list of characters within that rarity array list that was selected.
Basically,
Random Double Rates to Pick Rarity Array List > Random Int Index to Pick Random Character from Rarity Array List
Raising Anticipation With Delays
An added bonus to the summon feature I had is adding a delay in which the character's icon and name shows up. The background would be there so the user would at least know what rarity their character is, but the actual character themselves will be displayed 400ms later. This small feature works better in multi-pulls as it adds a layer of anticipation whenever a character summons. Implementation of this background, as well as delay, can be seen below:


As I've mentioned before, this gacha screen is linked to the next screen known as inventory, where characters pulled are displayed. In order to do that however, I needed to figure out how to save character data, and thus I decided to use the local database SQLite.
SQLite
This part was probably the most annoying feature to implement. Creating the DBHelper class to handle the db operations was easy enough, but figuring out the logic behind how I wanted to add the data was a massive roadblock for me.
But before I started with anything, I first created another class called LocalCharacter to store the data through SQLite:


The count parameter refers to how many times the user has gotten that character.
Essentially what I wanted to do was only add the character into the db if the user has at least one of the character. I don't know if I was overthinking it or something, but this took me forever to figure out the logic behind it. I've had several attempts where the insertion into the db would loop forever due to an incorrect placement of an if else statement.
Eventually however, I figured it out. What I had to do was create an ArrayList (allLocalCharacters) beforehand to retrieve all the characters within the database, and set their counters to 0, meaning the user starts with 0 characters. Then we create another ArrayList (reatrivedLocalCharacters) that retrieves already saved characters through the getAllCharacters() method of the DBHelper.
Now, we check through each item in allLocalCharacters with the retrievedLocalCharacters. If any of it exists, replace the count in the allLocalCharacters with the setCount() method of the retrievedLocalCharacters for that character.
Next, when the user pulls (be it multi or single), we check against allLocalCharacters array list, since it has the updated count values from the retrievedLocalCharacters, and if that character matches, increase the count by +1. Then delete the old record and insert the new one to ensure there are no duplicates.
The top image shows the code for what was described in the paragraph with orange highlights. This code was placed where characters are retrieved from the Firebase Realtime Database. The bottom shows the code for the paragraph in gray.


Simple, right?
... My explanation here may not be the best and may even be really scattered, but trust me, you don't want to think about it, either. And on that note, let's move on to the next part: the rates display dialog.
Rates Display Dialog
This was thankfully much easier to implement. Similar to the sort dialog, this is also a custom dialog whereby the rates for each rarity group is displayed, alongside the list of characters within that rarity with a custom adapter.


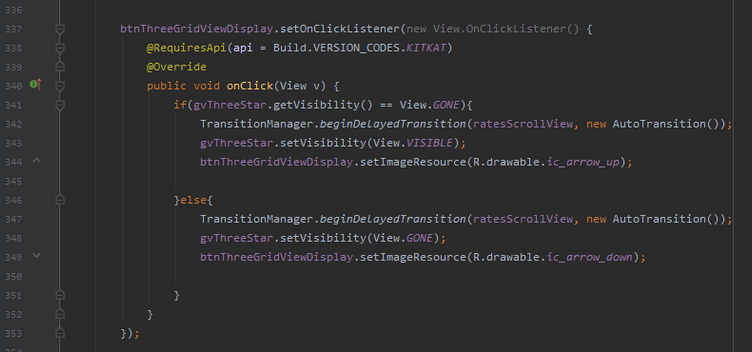
Tapping on those arrows to the right will display all the characters for that rarity group that can be pulled. The code is particularly for the three star bracket.
Application Development - Inventory
Overall, this wasn't too difficult. All it consisted of was a ListView that retrieves all characters that have been pulled by the user that were saved in the previous section. It also includes a button to clear the database.


The code itself wasn't too difficult, just retrieving the summoned characters from the SQLite database, as well as deleting them. An empty message will also be displayed should the SQLite database be empty.
Demo Video
So, yeah... that's about it. Thanks for reading through!
GitHub
https://github.com/Muhd-Haziq/ArchiveDB
APK
References
- Glide API - loading image from URL
https://github.com/bumptech/glide
- PhotoView library with image zooming
https://github.com/Baseflow/PhotoView
- Image-enlarging with animation (Official Documentation)
https://developer.android.com/training/animation/zoom
- Navigation Drawer
https://youtu.be/iesMhKUtYT8
- GridView + Custom Adapter
https://youtu.be/2RypDFzkIyg
- Custom Dialog Popup
https://youtu.be/0DH2tZjJtm0
- Blue Archive JP Wiki
https://bluearchive.wikiru.jp/
- Blue Archive EN Wiki (multiple)
https://bluearchive.miraheze.org/wiki/Main_Page
https://bluearchive.fandom.com/wiki/Blue_Archive_Wiki
https://www.thearchive.gg/
https://dolicon-bluearchive.netlify.app/


Comments